Let me introduce myself first, my name is Cedric, and I am a job-student working at ASP NV. My job title is “Junior Cloud Integration Engineer” and that basically means that I try to make systems communicate with each other through my developed applications also called “Processes”. These processes are made, edited, launched and supported through Boomi AtomSphere.
All these making systems communicate with each other is done through Boomi. Boomi is an iPaaS (integration platform as a service) which basically translates to a system that helps you extract data from some place, edit it if necessary and load it up to another place. I learned all my do and don’ts on train.boomi.com and most of my other questions were answered by going to community.boomi.com where you will find an active community of integration engineers.
Boomi
The assignment
My first assignment was to try to make a synchronization between Microsoft Dynamics 365 CRM and MailChimp in such a way that every day, twice a day, new/modified contacts made in Dynamics would be updated to MailChimp and that the MailChimp subscriber status would be updated to Dynamics. With my current skillset this translates to 2 separate processes that will both be run on a schedule. Maybe one day I might be able to do this in a single process, but this is not a requirement at this point in time.
I will mostly talk about the Dynamics to MailChimp contact sync since I find this one the most interesting and both processes are quite similar, just reversed.
My Boomi “level”
I have been studying Boomi since I started working at ASP. I currently only have the Associate Administrator Certification 2021 and am currently working on achieving my Architect Certification. This means I am only familiar with what feels like the basics. This translates to a Boomi Atomsphere level.
The processes
How I(t) started
A good rule of thumb within Boomi is to start at both ends of the process and to work your way to the middle. This is what I did for both processes. I first tried to get a connection with Microsoft Dynamics CRM which was easier than getting a connection with MailChimp thanks to the built-in Microsoft Dynamics connector.
Microsoft Dynamics CRM connection (where)

A connector always has 2 big parts: a connection and an operator. These correspond to the “where” and the “how/what” respectively. Configuring the connection was quite easy; I just had to ask a colleague what URL the Dynamics server was responding to and fill that in the required field. Same goes for username and password.
Microsoft Dynamics CRM operation (how/what)
The operation is also easily and quickly configured. Once the connection is configured (previous part) the operation only requires you to fill in your response profile. In this case the response-profile’s name is “contact” (since that is the name of the DB table within Dynamics) with the relevant contact fields such as “name”, “email”, etc.
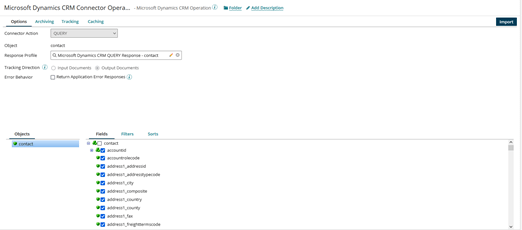
I also added a filter and a sort that only allows the contacts that have been “modifiedon” the last 2 days and sort them on the “modifiedon” property. By adding this the query will ask a lot less information from Dynamics making the process a little quicker compared to filtering after querying all contacts.

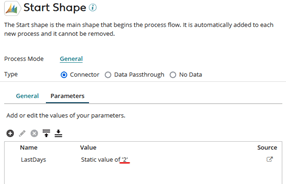
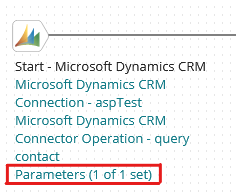
Once this is all configured Boomi will have a query ready for your connection when the process runs. Note that the filter operator needs a parameter “LastDays”. This will be asked on the Boomi Process canvas.
The query returns my Microsoft Dynamics CRM profile and other test subjects when these are modified 2 days or less compared to the time the process is running. The returned files are in XML format.
The MailChimp connector and its API
The configuration of the MailChimp connector was a little less straight-forward. This is mainly due to the lack of a built-in connector. This means the approach of the connector configuration is vastly different.
The first step I took was browsing the official MailChimp API documentation, which was pleasingly well built. If you would want to take a look for yourself, this can be done by visiting their website: https://mailchimp.com/developer/marketing/api/
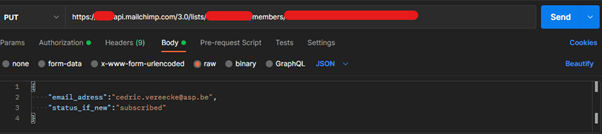
Every API call has at least 2 requirements: an URL and a method. The API call that is best for our use case is named “add or update list member”. This adds a third “body” requirement and a fourth basic authentication requirement.
- Method = put
- URL: https://{server}.api.mailchimp.com/3.0/lists/{list_id}/members/{subscriber_hash}
- List_id (found in URL)
- subscriber_hash (found in URL)
- email_address (found in request body)
- status_if_new (found in request body)
- basic auth API key
I first tested this out in PostMan as seen in the next picture:
If successful, this returns a JSON file with the account details.
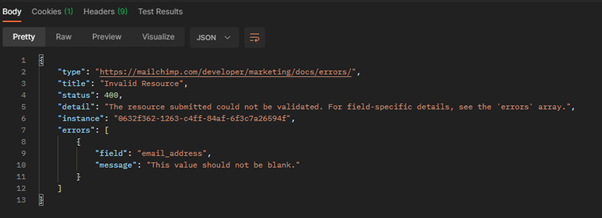
If unsuccessful, this returns a JSON comparable to the one shown on the following screenshot.
The reason for testing this out in PostMan before going directly to Boomi is that Postman allows me to “play” with my data and immediately see the results. This is a faster testing method.
Once I got the hang of it in PostMan, I knew what and how MailChimp required for this API call to work. Now it was time to do the same but in Boomi, which was not straight forward but after looking at some examples everything became clear:
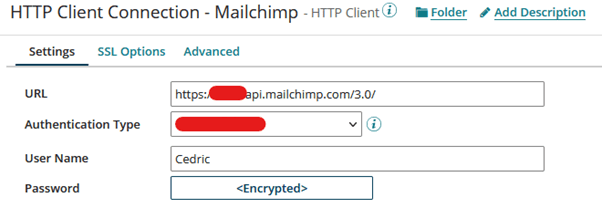
Within the HTTP connector connection, the base URL and the authentication are configured like so:
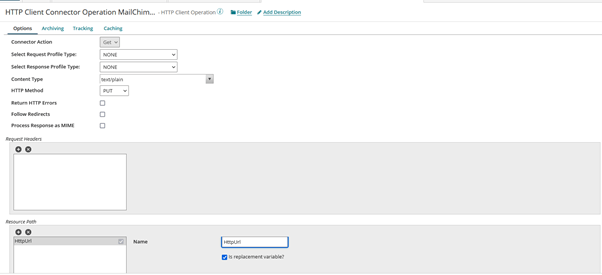
And within the HTTP connector operation the URL if further configured within the “Recourse path” as a replacement variable (preconfigured with a set properties shape). The HTTP method is also selected here.
The body is the actual document in the Boomi document flow that gets passed through to the HTTP connector shape meaning that this must be configured by a execute shape such as a map shape or a data process shape.
Knowing all this should make it a little easier to understand what exactly happens in the process that has been made:
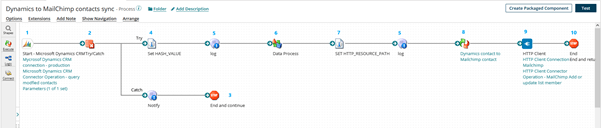
1: Only the contacts that have been modified in the last 2 days will be retrieved form the Microsoft Dynamics “contacts” database table.
2: a try catch ctaches any errors within the process, this should prevent errors from taking down the process with them.
3: if an error occurs, a mail will be sent to me with current data to notify me something went wrong.
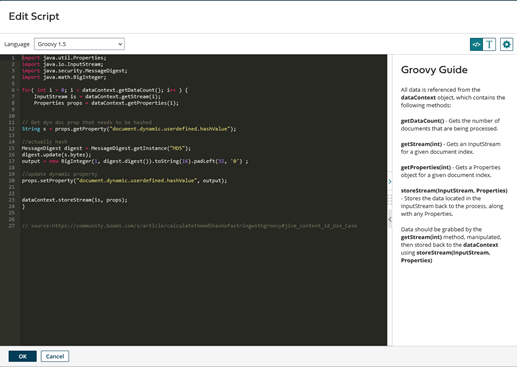
4: Since the HTTP request requires a hashed email address, I save the email address from the passing document as a dynamic document property for later hashing in step 6
5: a log to check if I successfully read a value or not (primarily used during testing, not for production)
6: a custom script to hash the value received in step 4.
7: after scripting is done, the HTTP URL is ready to be stitched together. This is done in this step.
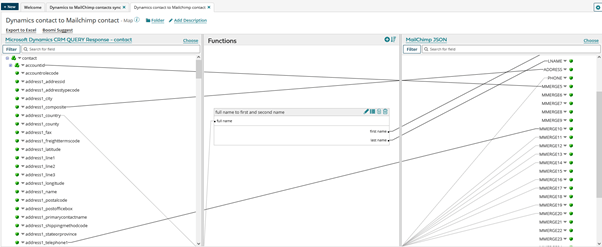
8: the mapping: all the Dynamics XML data that must be converted to JSON MailChimp data happens here
On step 9 the JSON that has been made in step 8 gets passed through to MailChimp through the http-connector with the URL configured in step 4,6 and 7.
Afterthoughts
Some improvements I am interested in making in the future would be to make this process real-time instead of a scheduled twice a day, this would decrease the number of times an unnecessary query is done. I would also like to have better error handling since MailChimp can produce errors is some rare occasions, but these are not dealt with in this process, at this point in time.
In any case; the process does what we require it to do so we have set it in production. This means it is time for some after thoughts: The main goal of this project was allowing me to learn something I could not learn at school and that goal has certainly been achieved.
I have also learned what it means to work together in an office setting and made some friends along the way. So, I would like to give my thanks to ASP for giving me this amazing opportunity and I am looking forward to what our future will bring.